This comprehensive guide will walk you through the steps to unpairing your Apple Watch, ensuring a smooth and hassle-free experience. Whether you’re an Apple Watch veteran or a newcomer to this remarkable device, this article will equip you with the knowledge to confidently navigate the unpairing process.
Apple Watch has revolutionized the way we interact with our devices, seamlessly integrating into our daily lives as a versatile companion. However, there are times when you might need to part ways with your trusty wearable, whether it’s for an upgrade, troubleshooting, or simply passing it on to someone else.

Whatever the reason, unpairing your Apple Watch is a straightforward process that ensures your data remains secure and your watch is ready for its next adventure. So, grab your Apple Watch and let’s dive into the world of unpairing together.
See Also: How to Record from Apple Music
How to Unpair Apple Watch
Unpairing your Apple Watch with your iPhone is a simple process that can be accomplished in just a few steps. Follow the instructions below to unpair your Apple Watch and sever the connection between the two devices:

- Step 1: Make sure your Apple Watch and iPhone are in close proximity and connected.
- Step 2: On your iPhone, open the “Watch” app. It’s the app with a green icon featuring a silhouette of an Apple Watch.
- Step 3: Within the “Watch” app, tap on the “My Watch” tab located at the bottom of the screen.
- Step 4: In the “My Watch” tab, scroll down and tap on the entry that corresponds to your Apple Watch.
- Step 5: You will now see the details of your Apple Watch. Tap on the “i” icon (information) next to your watch’s name.
- Step 6: On the next screen, tap on the “Unpair Apple Watch” option. A pop-up will appear, asking if you want to keep your cellular plan. Choose the appropriate option based on your preference.
- Step 7: Confirm the unpairing process by entering your Apple ID password when prompted. This step ensures that your Apple Watch is securely disconnected from your iCloud account.
- Step 8: The unpairing process will initiate, and you might see a progress wheel on your Apple Watch. It might take a few moments to complete.
- Step 9: Once the unpairing is complete, you will see a message on your iPhone stating that your Apple Watch has been unpaired successfully.
Congratulations! You have successfully unpaired your Apple Watch from your iPhone. Your Apple Watch is now ready to be paired with a new device or set up as a standalone device. Remember to back up your Apple Watch data if you plan to restore it on another device.
Note: Unpairing your Apple Watch will erase all data and settings from the watch, so ensure that you have backed up any important data before proceeding.
Why Unpairing Your Apple Watch is Necessary
Unpairing your Apple Watch is a necessary step for several reasons:

- Data Security: Unpairing your Apple Watch ensures that your personal data, including health and fitness information, app settings, and sensitive information, remains secure. When you unpair your watch, all data and settings are wiped from the device, preventing anyone from accessing your personal information.
- Device Maintenance: Unpairing your Apple Watch allows you to troubleshoot and resolve any issues you may be experiencing. Sometimes, unpairing and re-pairing your watch can help resolve connectivity issues, software glitches, or other performance-related problems.
- Upgrading or Selling: If you are upgrading to a new Apple Watch or planning to sell or give away your current one, unpairing is necessary. Unpairing ensures that the watch is dissociated from your iCloud account, preventing anyone else from accessing your data. It also allows the new owner to set up the watch as a new device and pair it with their own iPhone.
- Standalone Use: Unpairing your Apple Watch allows it to function as a standalone device. While most of its features are optimized when paired with an iPhone, unpairing allows you to use basic functionalities like timekeeping, alarms, timers, and tracking workouts without the need for an iPhone connection.
- Battery Conservation: Unpairing your Apple Watch can be useful if you won’t be using it for an extended period. By unpairing, you can conserve battery life by disabling unnecessary background processes and reducing power consumption.
By unpairing your Apple Watch, you ensure data security, enable device maintenance, facilitate upgrades or sales, explore standalone use, and conserve battery life. It’s an essential step that allows you to manage your watch effectively and maintain control over your personal information.
By following these simple steps, you can seamlessly unpair your Apple Watch and continue your journey with Apple’s remarkable wearable technology.
Preparing for Unpairing Watch
Before unpairing your Apple Watch, it’s a good idea to take a few preparatory steps to ensure a smooth transition and preserve your data. Here are some important things to consider:
- Backup Your Apple Watch: Creating a backup of your Apple Watch data before unpairing is crucial. This ensures that you can restore your settings, preferences, health data, and app configurations if needed. To back up your Apple Watch, ensure that your iPhone is backed up through iCloud or iTunes, as the watch data is included in the iPhone backup.
- Sync Your Health Data: If you use the Health app on your iPhone to track health and fitness data, make sure it’s fully synced with your Apple Watch. Open the Health app and navigate to the “Health Data” tab. Tap on “All” to view all categories, and check that your watch’s data is up to date and synced.
- Remove Activation Lock (if applicable): If your Apple Watch has cellular capabilities and is connected to a cellular plan, removing the activation lock before unpairing is important. You can do this by disabling the cellular plan through your carrier or contacting them for assistance.
- Disable Activation Lock on iPhone: Ensure that the “Find My” feature is turned off on your iPhone to prevent activation lock issues. Open the Settings app, tap on your Apple ID at the top, then go to “Find Me”, and disable the “Find My iPhone” option. This step helps in the unpairing process.
- Check Apple Watch Apps: Take note of any third-party apps or watch-specific apps you have installed on your Apple Watch. Some apps might require additional steps or backup procedures specific to their functionalities. Visit the respective app’s website or support page to learn about any necessary precautions.
By following these preparatory steps, you can ensure that your data is backed up, synced, and ready for a smooth unpairing process. These precautions help protect your valuable information and make it easier to set up your Apple Watch in the future, whether you’re upgrading, selling, or simply taking a break from using it.
Troubleshooting Tips for Unpaired Apple Watch
If you encounter any issues while unpairing your Apple Watch, here are a few troubleshooting tips to help resolve common problems:
- Ensure a Stable Connection: Make sure that your iPhone and Apple Watch are in close proximity and have a stable Bluetooth connection. Unpairing requires a strong connection between the devices for a smooth process.
- Restart both Devices: If you’re experiencing any connectivity issues or glitches, try restarting both your iPhone and Apple Watch. Power them off completely, then turn them back on after a few seconds and repeat the unpairing process.
- Update Software: Ensure that your iPhone and Apple Watch are running the latest software versions. Outdated software can sometimes cause compatibility issues. On your iPhone, go to Settings > General > Software Update, and on your Apple Watch, go to Settings > General > Software Update to check for and install any available updates.
- Disable Restrictions: If you have enabled any restrictions on your iPhone, such as restricting Bluetooth or removing the ability to unpair devices, ensure that those restrictions are temporarily disabled. The Restrictions settings are under Settings > Screen Time > Content & Privacy Restrictions.
- Reset Network Settings: In some cases, resetting your iPhone’s network settings can resolve connectivity issues. Go to Settings > General > Reset > Reset Network Settings. Keep in mind that this will remove saved Wi-Fi passwords and other network-related settings.
- Contact Apple Support: If you’re still experiencing issues or encountering error messages during the unpairing process, it’s recommended to contact Apple Support for further assistance. They can provide specific guidance based on your situation and help resolve any underlying issues.
Remember, unpairing your Apple Watch will erase all data and settings from the watch, so it’s essential to back up any important information before troubleshooting or seeking assistance. Following these troubleshooting tips should help you overcome common obstacles and successfully unpair your Apple Watch from your iPhone.
Unpairing Apple Watch with Multiple Devices
If your Apple Watch is paired with multiple devices, such as multiple iPhones or iPads, you can unpair it from each device individually. Here’s how you can unpair your Apple Watch from multiple devices:
On the first device:
- Open the “Watch” app on the device.
- Tap on the “My Watch” tab at the bottom.
- Locate your Apple Watch in the list and tap on it.
- Tap on the “i” icon (information) next to the watch’s name.
- Select “Unpair Apple Watch” and confirm the unpairing process.
On the second device:
Follow the same steps as above on the second device’s “Watch” app.
Locate your Apple Watch, tap on it, and proceed to unpair it.
Repeat these steps for each additional device your Apple Watch is paired with. It’s important to unpair the watch individually from each device to ensure a complete disconnection.
Keep in mind that unpairing your Apple Watch from one device will not automatically unpair it from any other devices it is connected to. Each pairing needs to be manually unpaired from the respective device.
Additionally, unpairing from one device won’t affect the cellular plan if your Apple Watch has one. The cellular plan will remain active until you unpair it from the device with which the plan is associated.
Following these steps will allow you to unpair your Apple Watch from multiple devices, ensuring a clean disconnection from each device individually.
Read Also: Apple Vs Android: The Tech Mobile Showdown
Unpairing your Apple Watch is a straightforward process that allows you to sever the connection between your watch and your iPhone or other devices. Whether you’re upgrading to a new Apple Watch, troubleshooting connectivity issues, or preparing to sell or give away your current device, unpairing ensures data security and a clean transition.
By following the step-by-step process outlined in this guide, you can easily unpair your Apple Watch. Remember to back up your watch’s data beforehand and take note of any specific app requirements or restrictions. Troubleshooting tips can help overcome any obstacles you may encounter during the unpairing process.
FAQs on How to Unpair Apple Watch
How do I unpair an already paired Apple Watch?
Open the Watch app on your iPhone, tap the My Watch tab, and then tap All Watches at the top of the screen. Tap the “i” button. Next to unpairing your Apple Watch, then tap Unpair Apple Watch.
How do I unpair my Apple Watch without my phone?
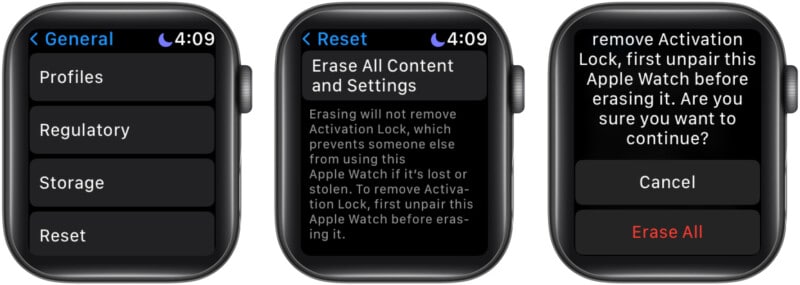
You can unpair your Apple Watch without the old iPhone by performing a factory reset on the watch.
How do I unlink my Apple Watch from my iPhone?
Keep your Apple Watch and iPhone close together as you unpairing your Apple watch.
Open the Apple Watch app on your iPhone.
Go to the My Watch tab and tap All Watches.
Tap the info button next to the watch that you want to unpair.
Tap Unpair Apple Watch.
How do I remove previous owner’s Apple ID from Apple Watch?
Open the Watch app on your iPhone and tap the My Watch tab. Tap All Watches at the top of the screen. Tap the information button next to your watch’s name. Tap Unpair Apple Watch, then tap the Unpair button again to confirm.
